一直有想做属于自己的 App 的想法,零零散散地有学习一些内容,现在决定开启一个记录学习过程的系列博文,以此来巩固自己所学到的 iOS 开发知识和激励自己把第一个 App 实现出来。
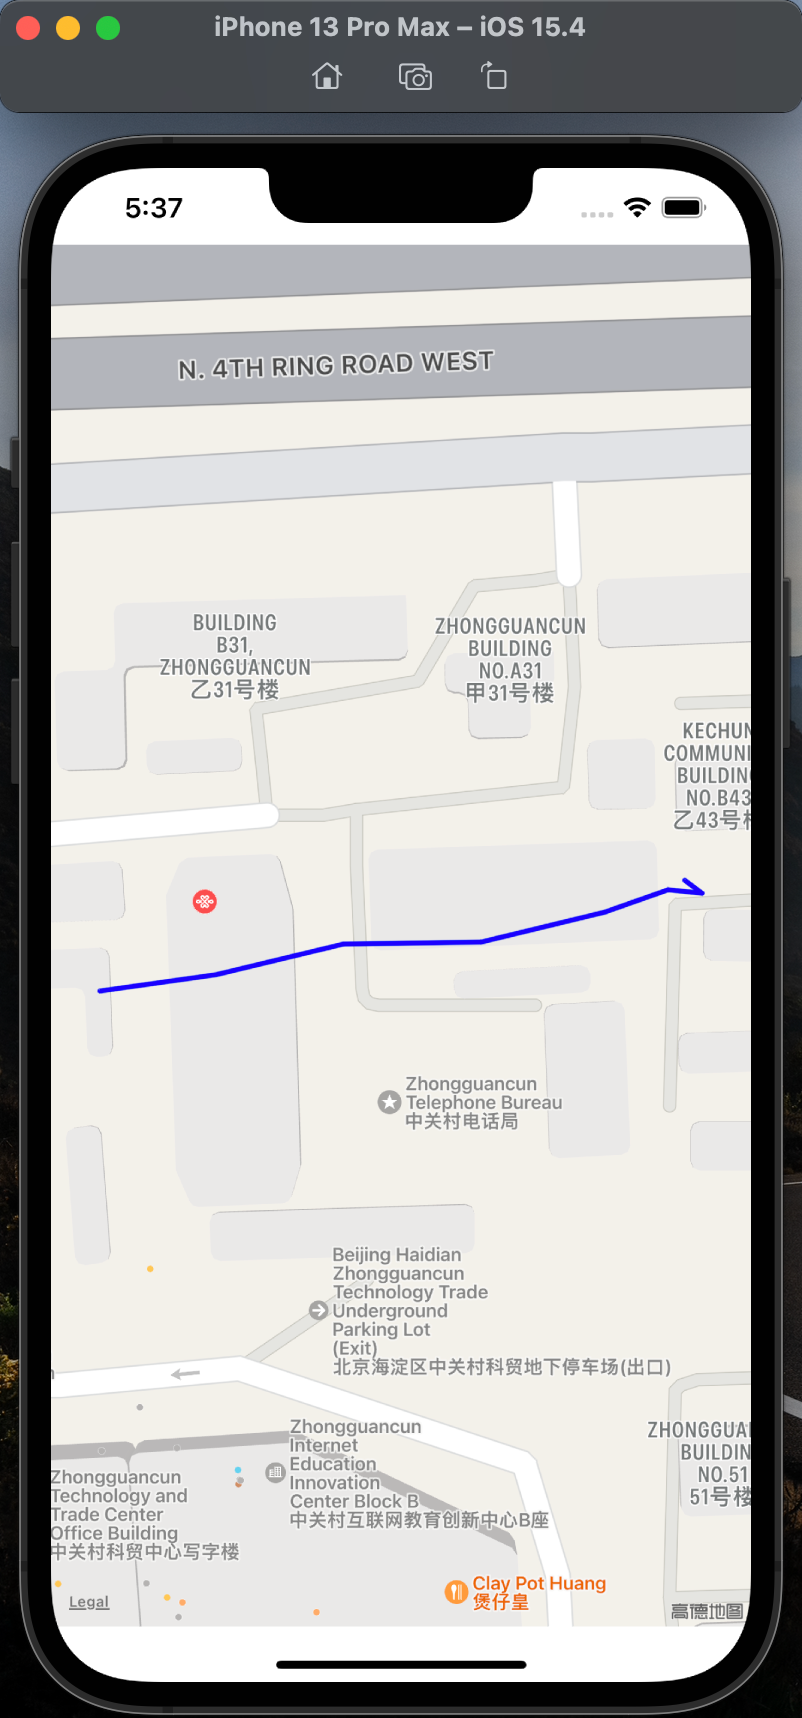
脑海中一直有个做地图类应用的想法,本科做移动轨迹相关的毕业设计。此类应用主要包括地图(Map)、坐标点(Location)、绘制轨迹(Polyline)几个要素。这篇博文将会使用 SwiftUI 在地图上连接坐标点绘制出轨迹。GPS 坐标数据可以在 microsoft 上下载。效果如下:
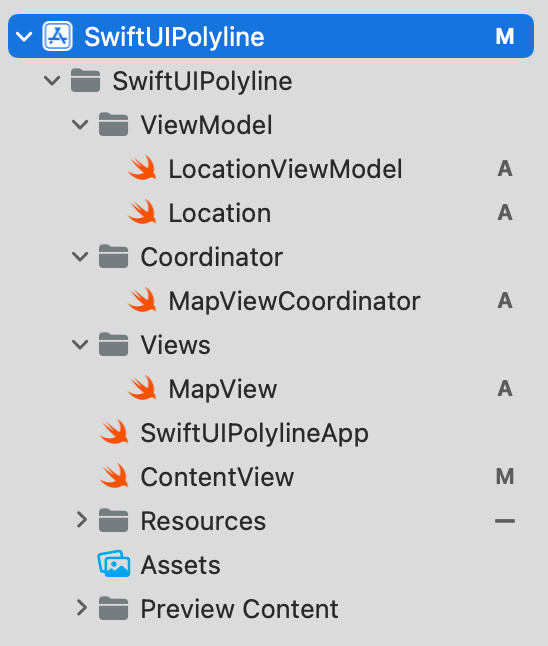
首先创建一个 SwiftUI 工程的项目,项目的文件组织如下:
先定义坐标点的数据结构,代码如下:
 1
 2
 3
 4
 5
 6
 7
 8
 9
10
import Foundation
struct Location : Hashable , Codable, Identifiable {
var id : Int
// 经度
var longitude : Double
// 纬度
var latitude : Double
var isValid : Bool
}
坐标数据的 ViewModel,我们将从 location.json 中加载所有的坐标点,代码如下:
 1
 2
 3
 4
 5
 6
 7
 8
 9
10
11
12
13
14
15
16
17
18
19
20
21
22
23
24
25
26
27
28
29
import Foundation
final class LocationViewModel : ObservableObject {
@Published var locations : [Location] = load("location.json" )
}
func load <T: Decodable>(_ fileName: String ) -> T {
// The data value type allows simple byte buffers to take on behavior of Foundation objects.
let data : Data
guard let file = Bundle.main.url(forResource: fileName, withExtension: nil ) else {
fatalError ("Couldn't find \( fileName) in main bundle." )
}
do {
data = try Data(contentsOf: file)
} catch {
fatalError ("Couldn't load \( fileName) from main bundle: \n \( error) " )
}
do {
let decoder = JSONDecoder()
return try decoder.decode(T.self , from: data)
} catch {
fatalError ("Couldn't parse \( fileName) as \( T.self ) : \n \( error) " )
}
}
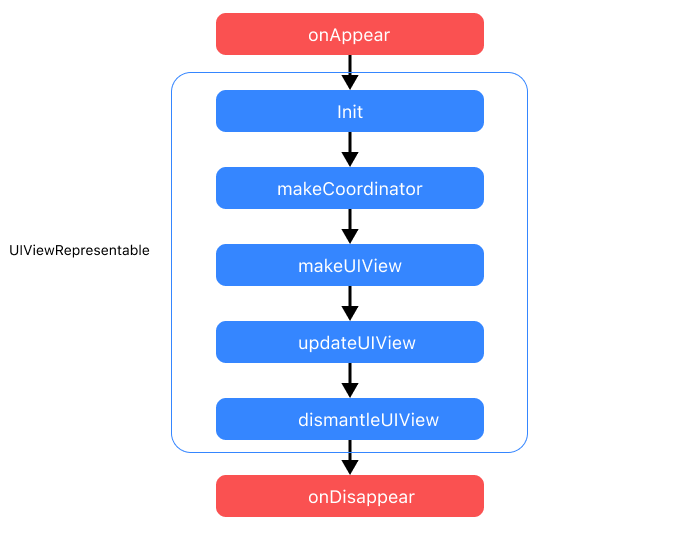
接下来我们将利用 UIViewRepresentable 这个协议实现将 UIKit 的 UIView 集成到 SwiftUI 中使用。UIViewRepresentable 只包含四个方法。其中 makeUIView , updateUIView 用于创建和更新视图。makeCoordinator 创建协调器,用于通知其它 UI 与该 View 之间的变化更新。dismantleUIView 用于在移除 View 时做一些善后操作。四个方法在 UIViewRepresentable 生命周期中的调用顺序如下:
我们的 MapView 代码如下:
 1
 2
 3
 4
 5
 6
 7
 8
 9
10
11
12
13
14
15
16
17
18
19
20
21
22
23
24
25
26
27
28
29
30
31
32
33
34
35
36
37
38
39
40
41
42
43
44
45
46
47
48
import SwiftUI
import MapKit
struct MapView : UIViewRepresentable {
private let locationViewModel = LocationViewModel()
private let mapZoomEdgeInsets = UIEdgeInsets(top: 30.0 , left : 30.0 , bottom: 30.0 , right : 30.0 )
func makeCoordinator () -> MapViewCoordinator {
MapViewCoordinator(self )
}
func makeUIView (context: Context) -> MKMapView {
let mapView = MKMapView()
mapView.showsUserLocation = true
mapView.delegate = context.coordinator
return mapView
}
func updateUIView (_ uiView: MKMapView, context: UIViewRepresentableContext<MapView>) {
updateOverlays(from: uiView)
}
private func updateOverlays (from mapView: MKMapView) {
mapView.removeOverlays(mapView.overlays)
var coordinates = [CLLocationCoordinate2D]()
for i in 0. .<locationViewModel.locations.count {
let location = locationViewModel.locations[i]
coordinates.append(CLLocationCoordinate2D(latitude: location.latitude, longitude: location.longitude))
}
let polyline = MKPolyline(coordinates: coordinates, count : locationViewModel.locations.count )
mapView.addOverlay(polyline)
setMapZoomArea(map : mapView, polyline: polyline, edgeInsets: mapZoomEdgeInsets, animated: true )
}
private func setMapZoomArea (map : MKMapView, polyline: MKPolyline, edgeInsets: UIEdgeInsets, animated: Bool = false ) {
map .setVisibleMapRect(polyline.boundingMapRect, edgePadding: edgeInsets, animated: animated)
}
}
struct MapView_Previews : PreviewProvider {
static var previews : some View {
MapView()
}
}
协调器 MayViewCoordinator 代码如下:
 1
 2
 3
 4
 5
 6
 7
 8
 9
10
11
12
13
14
15
16
17
18
19
20
21
22
23
24
25
26
27
28
import Foundation
import MapKit
final class MapViewCoordinator : NSObject, MKMapViewDelegate {
private let mapView : MapView
init (_ control: MapView) {
self .mapView = control
}
func mapView (_ mapView: MKMapView, didAdd views: [MKAnnotationView]) {
if let annotationView = views.first , let annotation = annotationView.annotation {
if annotation is MKUserLocation {
let region = MKCoordinateRegion(center: annotation.coordinate, latitudinalMeters: 1000 , longitudinalMeters: 1000 )
mapView.setRegion(region, animated: true )
}
}
}
func mapView (_ mapView: MKMapView, rendererFor overlay: MKOverlay) -> MKOverlayRenderer {
let renderer = MKPolylineRenderer(overlay: overlay)
// set the line properties such as color and width
renderer.strokeColor = .blue
renderer.lineWidth = 3.0
return renderer
}
}
参考链接
https://www.fatbobman.com/posts/uikitInSwiftUI/
https://medium.com/@mauvazquez/decoding-a-polyline-and-drawing-it-with-swiftui-mapkit-611952bd0ecb